OneNote: Tables, tables, everywhere!

OneNote: Tables, tables, everywhere!

OneNote has transformed the way in which I operate my classroom, but tables have transformed the way in which I use OneNote. Below are my top reasons why you should incorporate more tables into your OneNotes.

  1. Tables are quick and easy to create.

In the OneNote ribbon, click on the ‘Insert’ tab and then select the size table that you need.  More columns and rows can easily be added under the ‘Table’ tab.

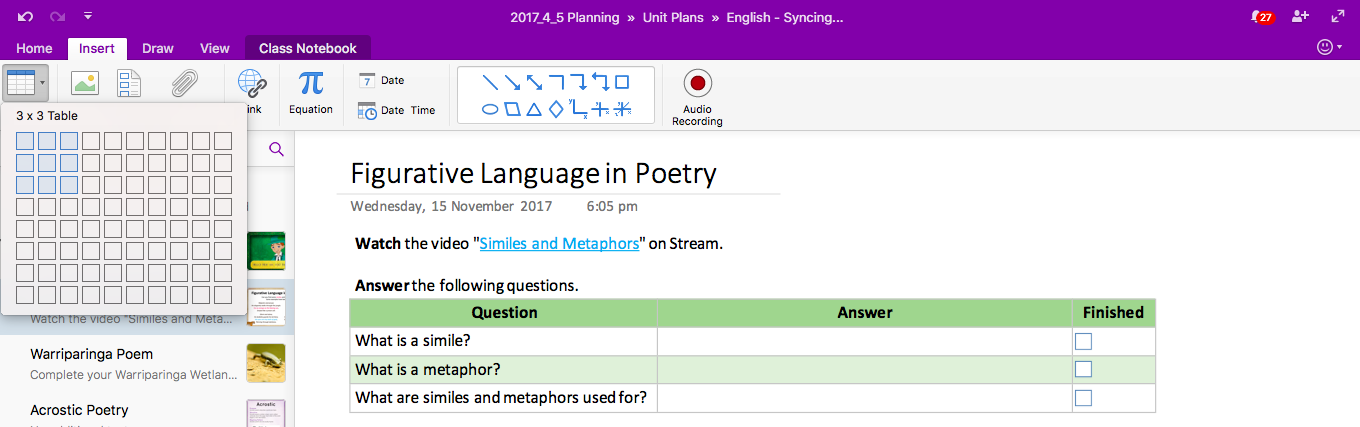
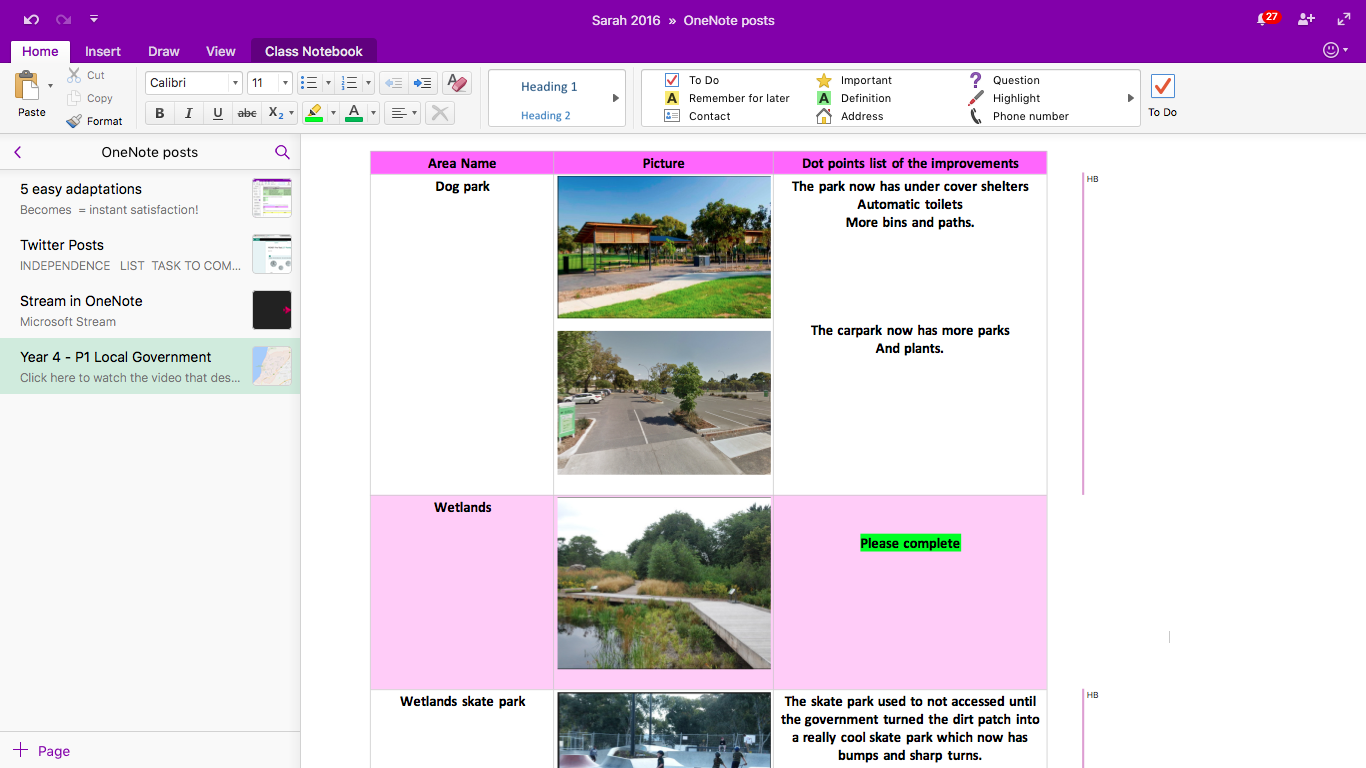
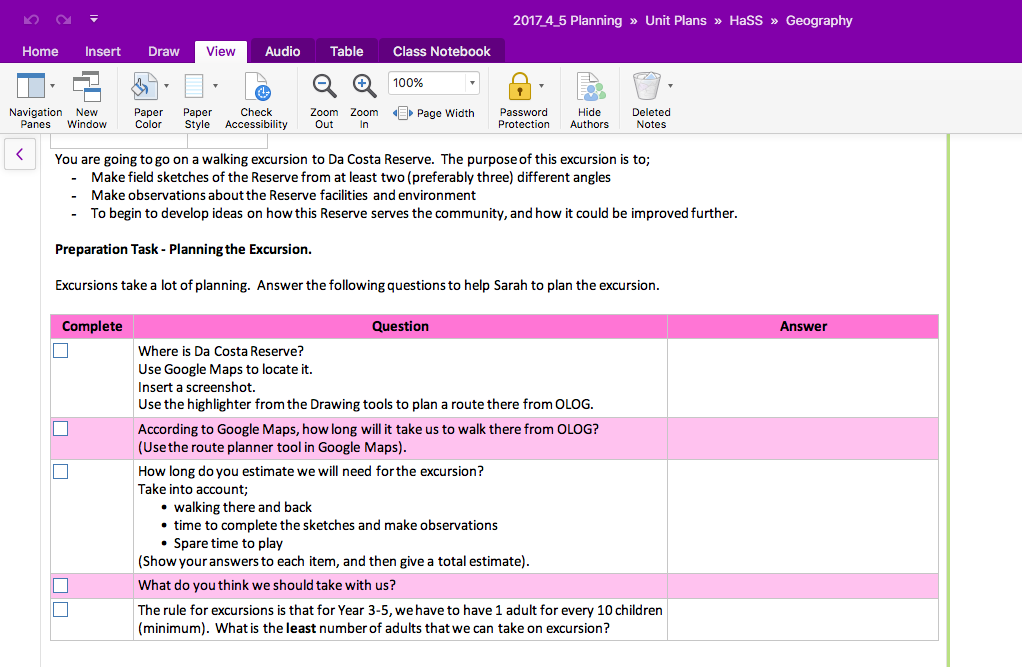
You’ll notice that my tables have alternating colours in them – this is to make scanning easier for learners with tracking difficulties – they don’t lose their place when they have clear colours to guide them.

  1. Tables are logical and become familiar to students – which means easy to use.

My learners enjoy consistency and knowing what the expectations are. They like knowing where to find information, and where to put answers. This is especially important for learners with extra needs. More about catering to learners with additional needs can be found in my blog post here. https://educationblog.microsoft.com/2017/09/5-easy-adaptations-learners-extra-needs/

  1. Tables make finding student responses (or lack of them) simple to identify.

I used to have to sift through information to find student responses. I experimented with having students highlight their answers with the highlighting tool or using a different colour font, but they often forgot. Marking was inefficient and painful. Once I switched to using tables with places for answers, I streamlined marking. Also, students can quickly and easily see where they are up to, and find it easy to come back to missed questions later.

Adding an extra column, inserting checkboxes and naming the column ‘Complete’ or ‘Finished’ takes just a few seconds, but gives learners a whole lot of satisfaction as they complete sections.  To read about more uses for checkboxes, read here. https://blogs.office.com/en-us/2017/06/05/the-humble-checkbox/?eu=true

  1. Tables break items into manageable chunks.

Some of the learners in my Village have planning difficulties. This means that they can struggle to break a large task or assignment into smaller, more manageable chunks (or parts for you non-Aussies). When I break tasks down for students regularly, they are eventually able to do this for themselves. Learners also feel less overwhelmed, and are more likely to be able to start their work, rather then just sitting and staring blankly at an empty screen.

  1. Tables prevent sync errors in the collaboration space.

The collaboration space is one of the best features of OneNote, but syncing errors did my head in initially. Students get very excited when they see other learners sharing their ideas in real time, but this can quickly turn to dismay when multiple pages begin to appear. I solved this problem with… You guessed it! Tables!

Assigning each learner or group of learners to a row or a box means that everyone can collaborate at the same time, but students don’t try and write in the same space, which creates sync errors. Not to mention, it makes everything look so much more organised and easy to read!

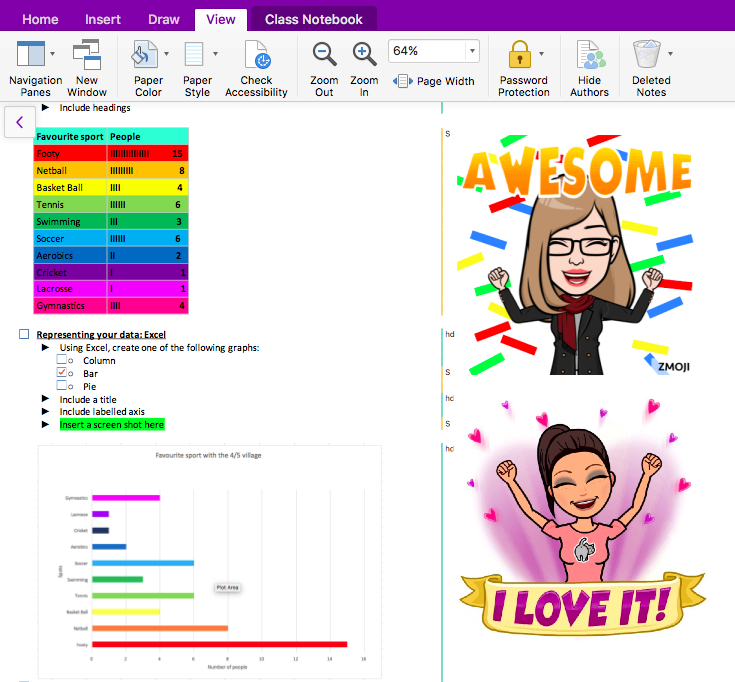
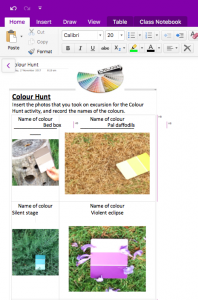
Here’s a recent piece of work created by one of my learners.  Look at how she’s colour coded her table to match her graph.  It makes my heart sing!


So there you have it! Quick, simple, saves time, and logical. Tables should be the best friend of every OneNote Educator!


Fakebooking it

Fakebooking it

History is one of my favourite subjects – it always has been ever since a high school teacher made trenches out of tables in class and pretended to machine gun us with his metre ruler to demonstrate trench warfare in WWI.

But, by the end of the Semester, my learners and I were getting a bit drained.  According to the Australian Curriculum for Year 5, we still needed to look at a significant person who helped to shape an Australian colony.  Colony influencers if you will.  This sparked an idea.  Who would my learners consider as influencers?  Most of them were people that had a heavy social media presence. Then, I found a wonderful free educational tool called Fakebook.

So here’s what we did.  I gave them a list of ‘colony influencers’ and then they conducted research, which could then be turned into posts as though their influencer was living in modern times.  It’s a pretty cool website to use.  Posts are written, and then you can make their ‘friends’ comment.  Pictures, links and videos can all be inserted.

The friends list and hobby list can also be updated.  It has a neat search feature which finds photos linked to the name of the person that you enter, which is usually pretty accurate – it can be changed as necessary though.

Fakebook, being a teaching tool even came with an assessment rubric, which I tweaked to suit the project.  My learners and I had a lot of fun with this tool, as while they were learning history, and working on timelines, they also got to show off their senses of humour. (Such as Lord Sydney throwing a party when Sydney got named after him, as announced by Governor Arthur Philip on his Fakebook account!

Two of the complete Fakebook posts made by my learners can be found here.

Caroline Chisholm and Governor Arthur Phillip.

We were also able to have quite a few thought provoking discussions about social media, cyber safety, and keeping safe online.

A couple of tips:

  • Make sure that learners write their posts and comments somewhere else first, such as in OneNote or on Word.  Then they can copy and paste them directly.  Fakebook won’t save a page until five posts have been created, so this was the best way to ensure that work in progress wasn’t lost.
  • A unique URL is created for each Fakebook page.  Learners need to copy and paste this somewhere safe to make sure that they can return to the page again, and more importantly – so it can be assessed!
  • The page will be password protected so that only authorised people can edit the page.  Again, make sure this password is put somewhere safe!

I’ll definitely use Fakebook again in the future.  It was fun, different, and had my learners re-enthused about doing research and turning facts into something that related more to their own lives.  I wonder if there is a fake Twitter or Instagram out there?


Living Kaurna and Warriparinga Wetlands Excursion

Living Kaurna and Warriparinga Wetlands Excursion

This week, we took our 4/5 Village to the Warriparinga Wetlands for a Living Kaurna tour and workshop.  Here’s the website info Living Kaurna Cultural Centre.  For those of you not local to the Adelaide region, the Kaurna people are the traditional Indigenous owners of the Adelaide plains.

We organised the tour as part of our work that we’re doing this term on Pope Francis’ Laudato Si – On Care of our Common Home.

We integrated this learning with the history and culture of the Kaurna people, poetry and photography.  It was absolutely brilliant!  The weather was a bit drizzly, but nobody melted and it wasn’t cold.  Our tour guide was brilliant – his passion and knowledge of his culture was contagious, and even some of our more reluctant learners were enthralled.  

As well as the guided tour, we had a booklet of activities for the students to do, and we took along iPad minis for photography purposes.  My favourite activity by far (aside from the actualtour) was the colour-chip photography.  Learners worked in pairs to find natural items that matched their colour chips as closely as possible, and then photographed them together.  The next day, they uploaded their photos into their OneNotes, and then used the colour-chip names as inspiration in their poetry.

A great day out, and we can recommend it to anyone in the Southern Adelaide region.


Skip to toolbar