6 Tips for Assessing in OneNote

6 Tips for Assessing in OneNote
  1.   Distribute everything! 

The Distribute and Review functions are easily my favourite Class OneNote tools. With a couple of clicks, I can distribute a page or section out to all of my learners.

Distribution changed my world!

The best part though, is when I want to review or assess their work. I just go into Class  Notebook tools, click on review work and follow the prompts. Then, I have the work of all my students, right there in front of me! This function has dramatically reduced the amount of time that I spend marking.


There are a few tips though;

  • Train your learners to NOT change the title. If they do, OneNote will not recognise that student’s work, and you will have to find it manually. (Not cool people! I remind my learners that they want me in a good mood when I’m assessing, not grouchy because they played with the title.)
  • Distribute EVERYTHING. Even if it is just a title such as “T1 W2 Recount” and a blank page. You never know when you might want to review work.
  • Don’t let learners create their own Sections. Each individual’s section will then be listed, and this is downright irritating when distributing and reviewing work.


  1. Allow alternative assessment methods for learners that need it

When I’m planning assessments, I ask myself what it is that I’m trying to find out. If the answer isn’t about spelling, grammar and punctuation, then I incorporate multimodal assessment features, especially for students with additional needs.

OneNote is great for this, particularly by allowing the insertion of

  • dot points
  • audio responses (read more here).
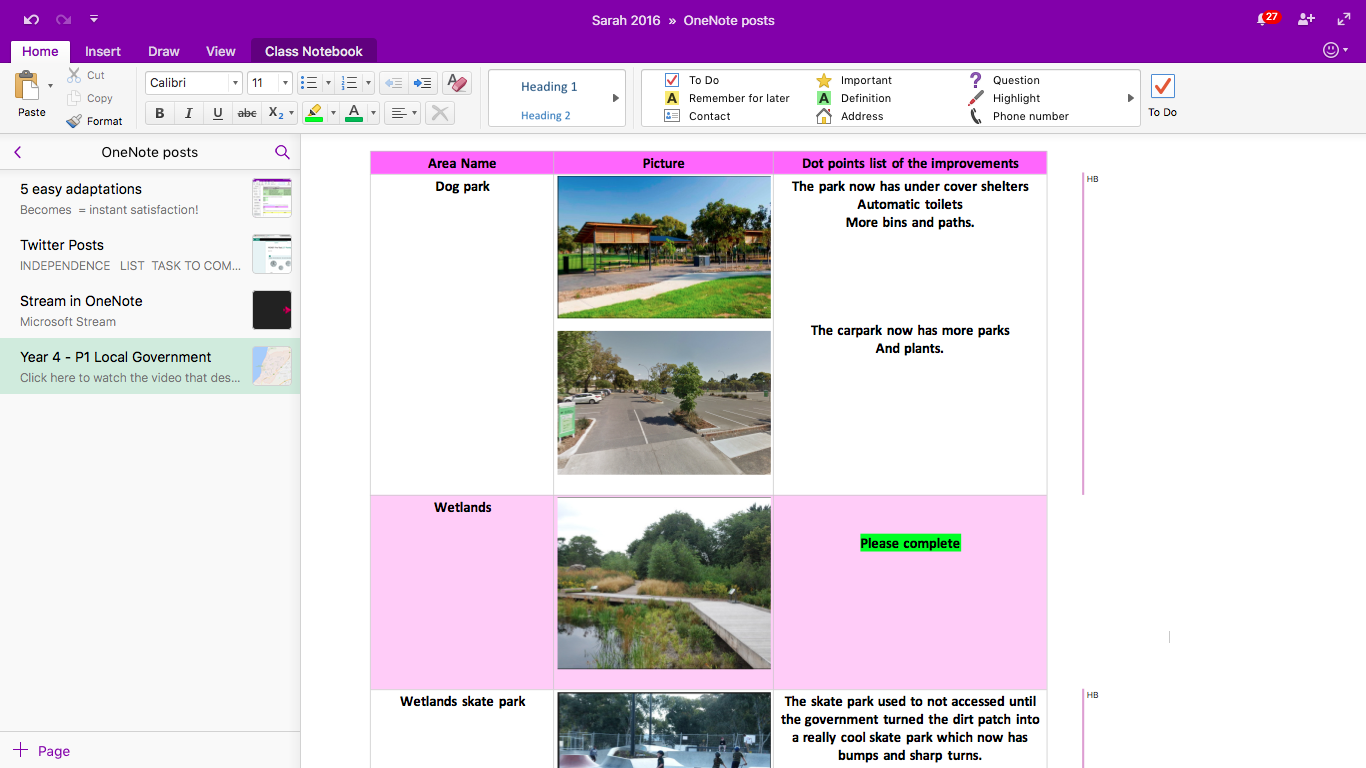
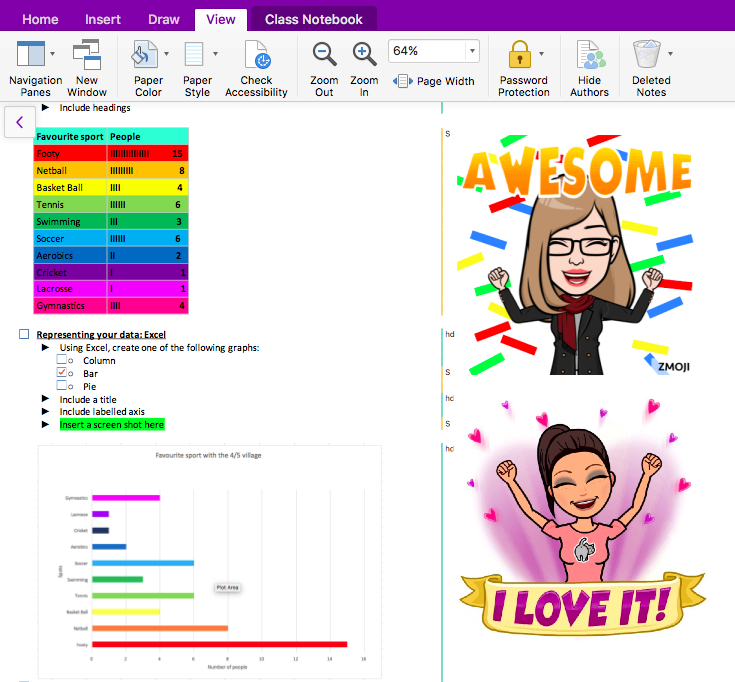
  • images
  • videos (though sadly, not in Mac at the moment)
  • Youtube will embed directly into OneNote for Mac.

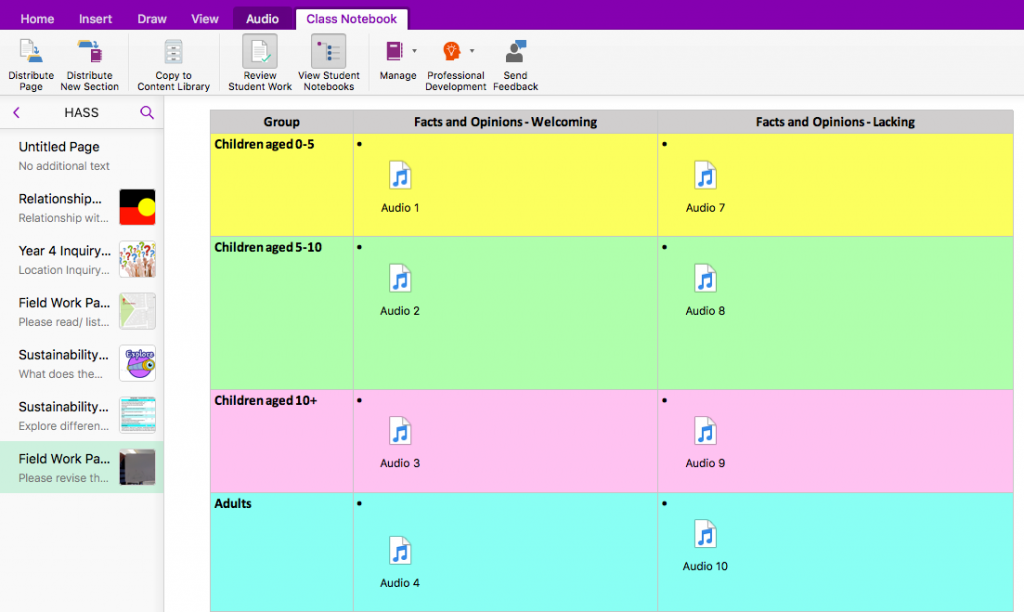
    Audio responses are great for students with dyslexia.
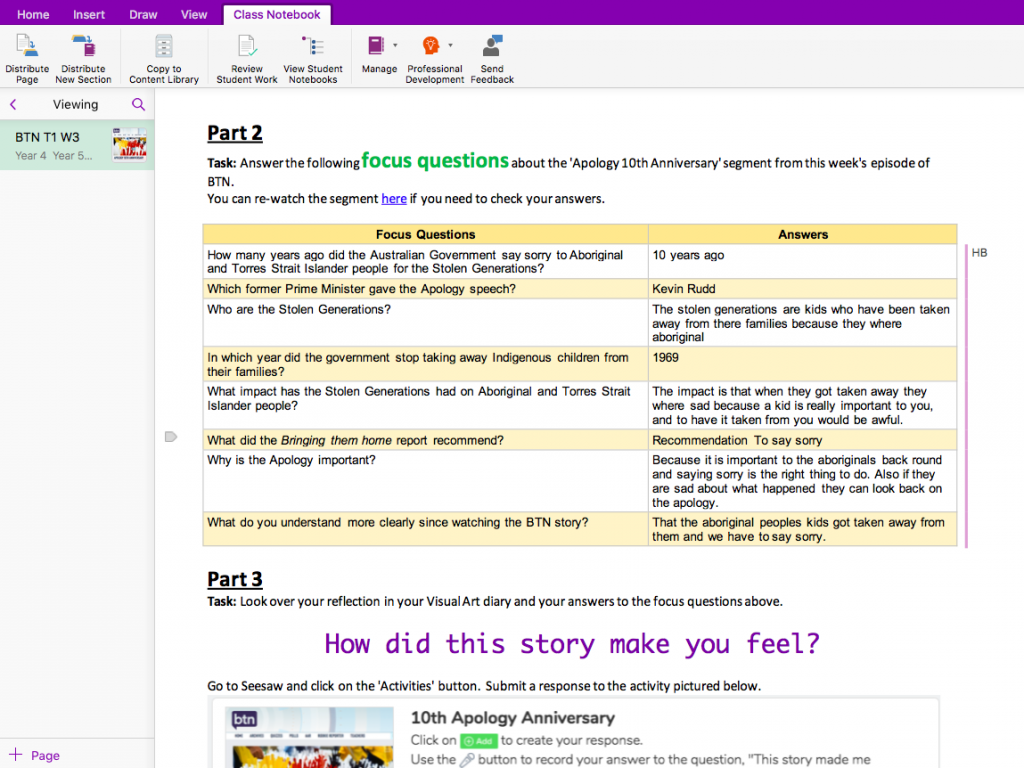
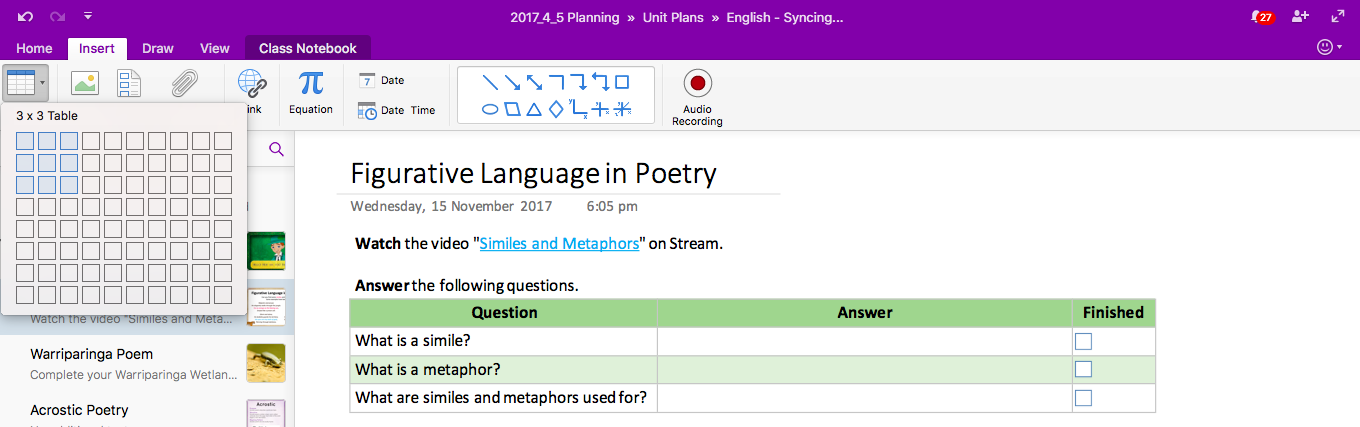
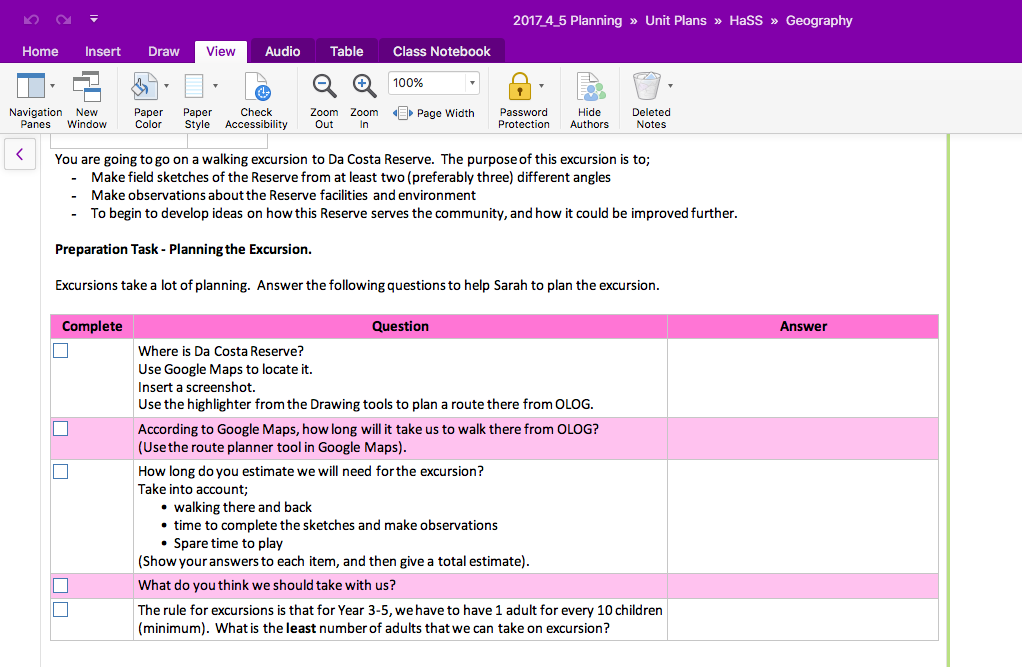
  1. Put questions and answers in tables

This is to make it easy for responses to be clearly written. This makes marking easy, as you don’t have to go searching for student answers amongst the text. More about tables in OneNote can be found in an earlier post here.

No more hunting for answers – I know exactly where to find them!


  1. Keep a copy of the marked rubric in a separate teacher-only location

 Kids will be kids, accidents happen, and I don’t like having to do a job twice. While I mark in the Class OneNote, I also have a second OneNote, containing my assessment data, and I copy and paste the completed rubric with my comments into a page per child.

Two Notebooks open – on the left is my ‘for teacher eyes only’ record, on the right is the Class OneNote.

It takes just a couple of seconds to do, but it provides a back up in case an accident (or “accident”) ever happens. It also means that when I met with parents, I have all the assessment rubrics in the one place.

I used to screenshot the completed rubric and then insert it back in as an image so that students couldn’t change their own grades, but it’s never happened, and I’m diligent about making the copy immediately, so I’ve scrapped the extra work  as being unnecessary.

  1. Include WALT, WILF and rubric in the assessment.

My students learn best when they know what they are learning, why they are learning it, and what I’m looking for when I mark an assessment. With that in mind, I make use of tables and the audio recording tool to enable students to have the best opportunity for success. (read more about differentiation here.)  Whenever I get the chance, I prefer to create the rubric with the learners, so that they understand exactly what they are being assessed on.  This is easy enough to do, and I can distribute the page out to them after we have made the rubric together.

Students refer to these regularly, along with the assessment rubric.
  1. Consider embedding a Form for a self marking component

Marking is one of my least favourite activities as a teacher. When possible, I include a Forms quiz and insert it into OneNote as a part of an overall assessment.  Just create the quiz in Forms, click on’ share’, get the Url and insert into OneNote. OneNote will embed the Form, making it easy for students to find and complete.

An embedded Form is great for a quick assessment.

Finally

What I love the most about assessing in OneNote though is simple logistics. I teach in a Village environment, which this year consists of 67 students, three teachers and three support staff. It simply isn’t possible to carry that many books home. Also, it’s very possible for books to go missing, or for another teacher to need them at the same time. With OneNote, I can assess efficiently, from anywhere.

Independence with OneNote

Independence with OneNote

We have a mix of several ongoing projects/ extended learning activities in our Village as well as shorter term activities.  We also, like any class, have learners who finish the shorter activities quickly.  There’s always something to do, but sometimes our learners get confused about what priority they should place on activities, or they just want to have a bit of agency over their learning and choose what they do and when.

So, we came up with the Independence List.  We have tried several designs over the last two years, but this is our current working model.

As you can see, the activities are down the left hand side.  Any that MUST be completed by Friday afternoon of that week are highlighted in green.

Student names run across the top.  You’ll notice that Harrison’s name is green – this means that he has currently completed everything, and he can have free time to work on a project of his choice.  (Most learners have been choosing Hour of Code activities lately).

Independence List Codes

  • Green – activity is complete and checked by an educator.
  • Yellow – student has been working on an activity, but not yet complete.
  • Red – activity has not been begun.
  • M – activity is marked by an educator, and feedback is available (usually in their OneNote page).
  • A – student was absent and does not have to do this activity.

What we love about this current model is that we’ve put it into the Content Library in the Class OneNote.  This means that learners can view the Independence List whenever and wherever they are (including at home with their parents).  But, because we’ve placed it into the Content Library, only educators can edit the list (no sneaky checking off activities that aren’t really up to standard!)

We’ve created a Section called Independence, and we create a new page for every week.  This way, when we get to assessment time, and we need to check boxes in report cards about items such as ‘organisation’, ‘manages time well’ etc, we have instant documented evidence.

We have also built in designated ‘Independence Blocks’ into our weekly planning.  This gives everyone a chance to work on their activities.  I did an informal survey of students a while ago, and they all agreed that Independence is great, and they used their time in a variety of ways.  Here are some of them below.

  • Start at the top, and work on a task until complete before moving onto the next one.
  • Do what I’m feeling the most excited about first, but keep watch on what has to be finished by Friday.
  • Do what I don’t enjoy as much first so I get it over with.
  • Set myself 15 minutes on an activity and then switch to something else so I don’t get bored.
  • Get everything done to what I think is a pass, then go back and try and improve.

Our learners with additional needs thrive off the Independence List.  It is clear, easy to read, and the colour codes are simple to understand.  Planning difficulties can be managed by reminding these learners to focus on the highlighted tasks.

The Independence List in the Content Library of Class OneNote has been a game-changer for us, because we don’t have learners constantly asking us, “What do I do now?”  They can always find out for themselves as it is always available to them!  Also, a simple question from an educator of, “How’s your Independence List looking?” is guaranteed to get a chatty child right back on task!

Link to my OneNote containing an Independence List that you can edit for your own students can be found here. 


OneNote: Tables, tables, everywhere!

OneNote: Tables, tables, everywhere!

OneNote has transformed the way in which I operate my classroom, but tables have transformed the way in which I use OneNote. Below are my top reasons why you should incorporate more tables into your OneNotes.

  1. Tables are quick and easy to create.

In the OneNote ribbon, click on the ‘Insert’ tab and then select the size table that you need.  More columns and rows can easily be added under the ‘Table’ tab.

You’ll notice that my tables have alternating colours in them – this is to make scanning easier for learners with tracking difficulties – they don’t lose their place when they have clear colours to guide them.

  1. Tables are logical and become familiar to students – which means easy to use.

My learners enjoy consistency and knowing what the expectations are. They like knowing where to find information, and where to put answers. This is especially important for learners with extra needs. More about catering to learners with additional needs can be found in my blog post here. https://educationblog.microsoft.com/2017/09/5-easy-adaptations-learners-extra-needs/

  1. Tables make finding student responses (or lack of them) simple to identify.

I used to have to sift through information to find student responses. I experimented with having students highlight their answers with the highlighting tool or using a different colour font, but they often forgot. Marking was inefficient and painful. Once I switched to using tables with places for answers, I streamlined marking. Also, students can quickly and easily see where they are up to, and find it easy to come back to missed questions later.

Adding an extra column, inserting checkboxes and naming the column ‘Complete’ or ‘Finished’ takes just a few seconds, but gives learners a whole lot of satisfaction as they complete sections.  To read about more uses for checkboxes, read here. https://blogs.office.com/en-us/2017/06/05/the-humble-checkbox/?eu=true

  1. Tables break items into manageable chunks.

Some of the learners in my Village have planning difficulties. This means that they can struggle to break a large task or assignment into smaller, more manageable chunks (or parts for you non-Aussies). When I break tasks down for students regularly, they are eventually able to do this for themselves. Learners also feel less overwhelmed, and are more likely to be able to start their work, rather then just sitting and staring blankly at an empty screen.

  1. Tables prevent sync errors in the collaboration space.

The collaboration space is one of the best features of OneNote, but syncing errors did my head in initially. Students get very excited when they see other learners sharing their ideas in real time, but this can quickly turn to dismay when multiple pages begin to appear. I solved this problem with… You guessed it! Tables!

Assigning each learner or group of learners to a row or a box means that everyone can collaborate at the same time, but students don’t try and write in the same space, which creates sync errors. Not to mention, it makes everything look so much more organised and easy to read!

Here’s a recent piece of work created by one of my learners.  Look at how she’s colour coded her table to match her graph.  It makes my heart sing!


So there you have it! Quick, simple, saves time, and logical. Tables should be the best friend of every OneNote Educator!


Skip to toolbar