Minecraft Lunch Club!

Minecraft Lunch Club!

This blog post is co-written with the lovely Heather Docherty – my main partner in crime (I mean, inspirational work colleague!) You can follow her on Twitter here: @hdocherty215  and while we’re at it, my Twitter handle here: @teacherbau


For the past few weeks, we have been volunteering our time to run a playtime Minecraft Club for 20 learners from Years 3, 4 and 5.  Learners were put into teams consisting of two Year 5s, one Year 4 and one Year 3.  

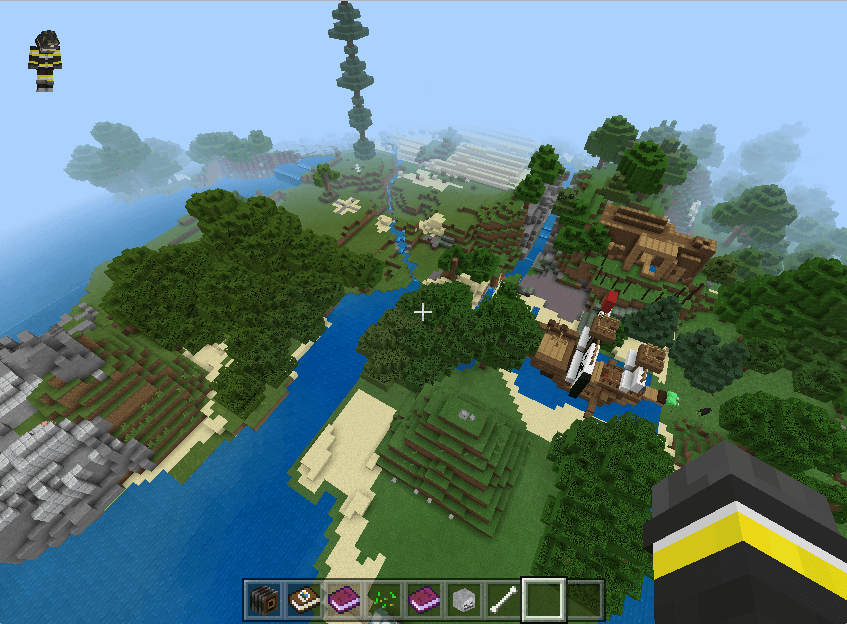
Over the course of the five weeks, the teams worked together to complete challenges in a world that was created based on the book Treasure Island by Robert Louis Stevenson.  It’s a brilliant world, you can find it on the Minecraft Education Edition website here.

The challenges that learners participated in were: 

  • Compass Challenge 
  • Scavenger Hunt 
  • Treasure Map 

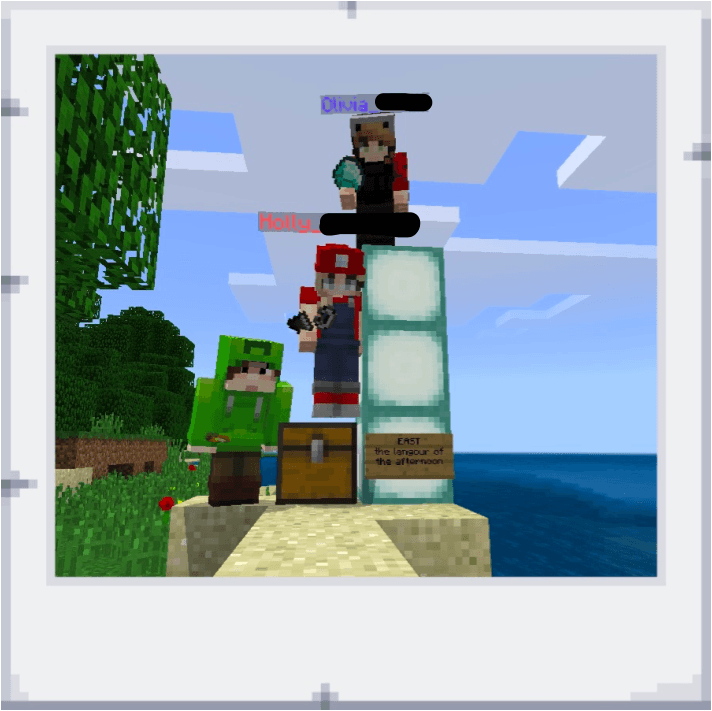
In Compass Challenge, learners had to navigate around the Island and discover beacons placed at the eight main compass directions. To prove that they worked as a team, they had to take a team photo at each location, and send the photos to the two of us.  This was challenging because learners were tempted to fly off in all directions, and then had to negotiate where to go first, how to gather as a group for the photo, and how to keep track of which beacons had not yet been located. 

During Scavenger Hunt, learners worked in their same teams to find all of the items listed in a Minecraft Notebook. They were able to split up for this challenge, as time was limited. This challenge required constant communication and co-ordination as learners had to determine which items had been found, and ensure that photos of each finding were taken to record the location of the objects as evidence.  There was a great deal of confusion and then laughter as learners tried to complete the item, ‘tame a parrot’. 

Finally, learners were presented with the most complicated challenge yet – Treasure Map.  The Island they were working in is based on the original drawing from the book Treasure Island, with treasure hidden at the three locations marked with an ‘X’ on the original map. Learners had to work together to interpret the map on the Smartboard and compare it to the map on their computers within Minecraft. This required learners to use their understanding of map reading, including rotating, zooming and closely observing details.  Working within a limited timeframe meant that learners had to collaborate, with some taking on the role of map reader, team coordinator, treasure digger and photographer. 

Logistics

To enable the Minecraft Club to be a success, we created excitement amongst the students by informing them during the day that the Club would be on offer.  We then held a ‘find out more’ session during a lunch time.  We showed them the world, and explained how the Club would work.  We then took down the names of learners that were interested (some decided it wasn’t for them – they had been hoping for free play).  Happy to say, we had far too many interested learners!  So, we drew names then and there out of a hat, and created the first cohort. We sent home permission letters, outlining that it was a commitment, and it would be taking place during a playtime.  We also explained that continued participation hinged on learners following the school’s established ICT agreement.  We had 100% take-up, and our learners eagerly attended every session.

Outcome

We have been very proud of the collaboration between learners, with more experienced players providing guidance and support for newer participants. Seeing learners from a mix of year levels engaged together in problem solving, negotiation and fun has been well worth giving up some break time!  We had a new contingent of learners begin the Club this week, and we’ll be hunting through the Minecraft for Education World Library for another suitable world for later next term.

Conclusion

Give it a go!  It was fantastic that we had each other – that meant we could still take it in turns to duck out and have a snack etc.  So, while you could run a club by yourself, everything is better with friends, so we recommend that you rope in a colleague. You don’t have to have a lot of personal knowledge of or ability in Minecraft, just read the notes attached to the world.  An open mind and adventurous spirit will get you through!


Real Estate in Minecraft

Real Estate in Minecraft

Ok, so the first lesson we did made sure that all Learners had the same basic skills to navigate and create in Minecraft.

This lesson in Minecraft Education Edition was all about helping learners and their families realise the educational potential of Minecraft. The lesson was based in Starter Town – a lovely little world with some basic civics buildings and 30 numbered empty blocks of land – just waiting for eager builders!

Students negotiated amongst themselves on land selection, and were given two lessons to build, fit out and photograph their property.  (They won’t always need that long, but many of the students are still adjusting to the controls on Macbooks). The whole lesson was outlined in OneNote to ensure that learners stayed on track.  I’ve shared the overall lesson plan here (just look for the page called ‘Starter Town – Real Estate’.) . The Learning Intentions are shown in the image below.

Learners created such diverse houses – from castles to mansions, to mushroom cottages, to log cabins to glass houses.  Infinity pools, cinemas, fireplaces, libraries – all included.

This is where it got educational – learners had to create a sales pitch for their property, based on real estate adverts, then create and publish a tri-fold brochure.  We used the website Canva, which has a brilliant range of easy to use templates.  Just make sure that students don’t accidentally include any paid features – they can’t download their work if they do.. The completed products were very impressive, and I discovered creative flair that I hadn’t suspected lived within some of the students.  Below is one of my Learner’s brochures.  I love his use of colours, photos of unique features and range of adjectives used.

Brochures were printed double sided, and then trimmed, folded and sent home – with strict instructions to share immediately with parents. The verbal feedback that I received from parents was very positive – their children were coming home excited about their day, babbling about Minecraft, and excitedly thrusting brochures under their noses.  Students that were usually reluctant writers were incredibly keen to explain the features of their property, and to justify the hefty price tags attached!  Everyone could instantly see the educational value of Minecraft – in this instance, it was used as a prompt to inspire literacy.

A win-win-win situation if ever I saw one – happy learners, happy parents, happy me!  Next lesson will be looking at the Civics buildings that are in Starter Town.  I can’t wait!

Class Compliments

Class Compliments

I’ll admit it – I was having a grouchy kind of morning.  You know, the kind where you haven’t slept properly, where there was no milk for your tea, rain was threatening – nothing Earth shattering – just a little black cloud over my head.

I had a Keeping Them Safe – Child Protection lesson planned. Part of the lesson involved writing down nice things about your classmates.

I’d come across the perfect little activity on Seesaw.  It’s called Classmate Compliments. Simple really – children open up Seesaw, take a selfie (with a fair amount of background room), then leave their computers open, and move around the room, writing down something nice on ten different computers.

I gave some pretty clear instructions…

  • You don’t have to be friends with everyone, but you do have to be friendly with everyone – kind words only.
  • Challenge yourself – don’t write on your best friend’s picture – you tell them how awesome they are all the time – pick people outside of your close friends.
  • Mix it up – boys, girls, different year level to you.
  • Don’t just write about looks – you’ve been in a Village with these people for at least six months – go deeper.

There was a buzz and excitement in the room that is usually reserved for Minecraft lessons. My slightly-sarcastic, little-bit-jaded, too-cool-for-school Year 4s and 5s forgot to pretend to be blasé, and got right into it. I overheard some of the kids saying, “This is fun!  I like this!” At the end of the session, they all excitedly went back to their computers.  They mouthed the words to themselves at first, then the tentative smiles turned into grins, and the grins into excited shouts.  “People think I’m smart?”  “You really are funny!”  “Someone said I’m inclusive, and that I’m a good friend!”  My little black cloud began to lighten – and I found myself smiling.

“Who’s feeling a little bit special right now?”  I asked. Every hand went up. They were all grinning from ear to ear.

In demonstrating, I had taken a selfie, and left my computer open too.  You’ll have to excuse the photo – remember, I hadn’t slept well, had almost no make-up on, and the overcast morning came with a healthy dose of bad-hair-day wind.  But, the results, well, they speak for themselves!

My little black cloud evaporated instantly, and I had to read the words through happy tears. I looked up to find everyone smiling at me. “You have the most words Sarah!” “Yeah, everyone was lining up to write on your photo.”

I looked at my kids and smiled, “I really do love you guys.”

PS – My son is one of my students – hence the ‘Great Mum’ comment!

PPS – I’m pretty good at flossing – the kids taught me on school camp!

Beginning with Minecraft Education Edition

Beginning with Minecraft Education Edition

Feeling overwhelmed at the mere thought of trying to use Minecraft Education Edition with your students?  I’m guessing that this is because your students know so much more about how to play it than you do?  Never fear – just strap on a growth mindset, be prepared to learn from your students, and dive straight in!

Minecraft Education Edition is a new adventure for me.  I’m currently heading up a team at my school where we are taking part in a Catholic Ed SA project for using Minecraft Education Edition through a religious lens, with the aim of teaching sustainability. But, before we could get to a religious perspective, we had to up the Minecraft skills of our students, and get them used to the idea that this was learning, not just play!

Needless to say, they were beside themselves with excitement.  I’ve been teaching the same group of learners for a couple of years now, and they have an excellent growth mindset (particularly when it comes to digitech!) and love to be my guinea pigs.  To begin with, we got all students participating in the project (all Year 3, 4 and 5 learners – around 100 students) together and we established our agreed practices.  The teaching team felt that this was important, to separate learning from playing, right from the beginning.  Here is a copy of what we came up with.

The agreed practices has been invaluable – there has been absolutely no confusion about which worlds students need to reserve for learning, and which ones they can use during inside play (for example due to bad weather).

Side note: the Big 5 is a school-wide code of conduct, and consists of:

  • Be Christlike
  • Be Brave
  • Be Supportive
  • Be Respectful
  • Be Safe

So anyway, to keep the learners focused on the fact that we were undertaking learning tasks, I did what I do best – I created a lesson in Class OneNote and distributed it to my Year 4-5 learners.  There’s nothing like clear Learning Intentions to remind students that we are learning, not just playing!

The first hurdle I had to overcome was – how do I teach 66 learners all at once?  Turns out that I didn’t have to – I had a significant number of Minecraft Experts on my hands!  I had all of the learners self-nominate their level of expertise, and then put themselves into groups of the following;

  • 1 Minecraft Expert
  • 1-2 Minecraft Middle-Roaders
  • 1-2 Minecraft Beginners.

One of my favourite aspects of this – is that the children that were Minecraft Experts, are not necessarily the usual leaders in my Village – giving a whole new level of respect to students who don’t always get to shine.

We strongly discourage (read don’t allow) learners to download anything off the internet.  So, in order for learners to have access to the Minecraft worlds that I want them to use, I created a shared folder in OneDrive.  Only one student from each group needs to download the world, and then the other members of that group can join up.  I went through the instructions step-by-step, but also included a screenshot and instructions in OneNote so that learners could remember how it’s done.

The groups of students then worked together to build expertise and get through all of the levels.  There was a huge buzz in the room, and seeing such diverse groupings of learners encouraging and supporting each other warmed my teacher heart.

All of the worlds that I’m using come straight off the Minecraft Education Edition website – a fantastic resource for Educators like me – willing, but not necessarily brilliant at using Minecraft.  All of the work is done for you!

What did I take away from this lesson?  That my learners continually surprise me and that they have more patience and persistence than I sometimes give them credit for.  I learned that I don’t have to be an expert at a technology in order to use it with students, I just have to set clear Learning Intentions, and the learners will do the rest.

Oh, and I also learned that my students love it when I bumble around with them – they really enjoy teaching me tips and tricks!  Go on – give it a go!

St Dominic’s Day

St Dominic’s Day

It really does take a Village to raise a child!

I’ve often mentioned in my blog posts in passing that I teach in a ‘Village’. This year, my Village consists of 66 learners and 3 Educators.  I’ve never really explained just what that actually means though.  My activity from St. Dominic’s Day this year gives me the perfect opportunity.

At Our Lady of Grace School, we teach in Villages. I teach in the Year 4/5 Village – currently the highest year level at our school.  There’s also a Village for Year 2/3 learners, and one for R/1 learners (R stands for Reception – a uniquely South Australian term for what other states call ‘prep’ or ‘foundation’.)

Working in a Village is a wonderful experience.  I get to work closely with two other Educators, and we can rely on each other when we’re having a bad day, off sick, to bounce ideas off, to have each other’s backs – basically to look out for each other.  Teaching can be an isolating job.  Between teaching and yard duties, I used to be able to go an entire day with barely a word to another adult.  There’s nothing better than being able to catch the eye of a colleague across the room and grin when something goes well!

The benefits aren’t just for the adults in the room though.  Our learners benefit too.  Educator off sick?  That’s ok – there’s still going to be two other Educators in the room that understand individuals, learning needs, social needs, friendship worries and family concerns. Haven’t really connected with one of the Educators yet?  That’s ok – there are two other different personalities in the room too.  Need a bit of extra support/ extension?  There are three adults to go around!

We maintain strong links between Villages too. Buddies, Junior Primary Fitness, Junior Primary Reading, Minecraft Club, Whole School Circle Time – all are Inter-Village events.

In honour of the Feast of St Dominic we had whole school rotations.  I teamed up with an Educator from the R/1 Village.  We began each rotation with a rendition of Bruno Mars’ “You Can Count on Me,” and then split the group in half.  Half added musical instruments to the song, and half came next door with me to add their hand to our school tree, before swapping.  I’m pretty pleased with the overall result of the tree – if I do say so myself.

It takes a Village to raise a child – and I wouldn’t have it any other way!


Microsoft Innovative Educator (MIE) Expert

Microsoft Innovative Educator (MIE) Expert


I’m just a little bit excited.  Ok, I’ll admit it – I may have danced around in front of the computer and fist bumped the air.  Did a little flossing – maybe!  I’m super thrilled to announce that I’ve been accepted into the Microsoft Innovative Educator Expert program for 2018-19!

Here’s the offical press release below.  What does this mean for me?  More growth, more development, more innovation, more community, more connection, more learning, more sharing, more facilitating, and (if possible) more passion for what I do. Let the new adventure begin!

Sarah Bau from Our Lady of Grace School Selected as Microsoft Innovative Educator (MIE) Expert

Recognised as global leader in using technology to transform education

August 1st – Adelaide – Our Lady of Grace – Glengowrie

Sarah Bau was announced today as a Microsoft Innovative Educator (MIE) Expert joining the more than 7,600 educators in the MIE Expert program worldwide. Each year, Microsoft selects innovative educators to share ideas, try new approaches and learn from each other as a global community dedicated to improving student outcomes through technology.

Mrs Bau, Year 4/5 Educator and Key ICT Teacher at Our Lady of Grace School, within the Catholic Education sector of South Australia, stated that she is,

“…excited and proud to have been named a Microsoft Innovative Educator Expert.  I can’t wait to begin learning with my new international community of highly skilled and enthusiastic educators.  I’m looking forward to sharing my knowledge and experience both within Our Lady of Grace School, and the wider community.”

As an MIE Expert, educators build their capacity for using technology in both the classroom and curriculum to improve student learning, advise Microsoft and educational institutions on how to integrate technology in pedagogically sound ways and be an advocate at conferences, events and trainings for how Microsoft technology can improve learning.

“Microsoft Innovative Educator Experts are inspiring examples of educators applying new ways of teaching and learning in their classrooms that motivate students and empower them to achieve more,” said Anthony Salcito, Vice President, Worldwide Education, Microsoft. “We celebrate and support the work they do every day!”

To learn more about the MIE Expert program, you can find out more here: http://aka.ms/mieexpert. If you are an educator and interested in joining the MIE program, you can begin by joining the Microsoft Educator Community, where you can learn and grow professionally, exchange ideas and learn from others, and make connections globally and earn recognition.

Ozobots, OneNote and Seesaw

Ozobots, OneNote and Seesaw

Recently, Our Lady of Grace was fortunate enough to borrow a set of 12 Ozobots from the Catholic Education SA Learning Technologies Team.  All Learners throughout the three Villages had the opportunity to use the Ozobots as part of their learning in the Digital Technologies curriculum. I was able to combine several of my favourite Digital Technologies tools – OneNote, Seesaw and robots (Ozobots in this case).


Learners in the 4/5 Village established an understanding of how the Ozobots worked, and then used the visual programming codes to create algorithms and debugged their algorithms to solve problems.  They used their knowledge of measurement to create a ‘race track’ measuring at least 100cm in length and incorporated a number of codes that they felt would help them to win a race against another Ozobot and learner.  This assessment was adapted from the Ozobot website – original lesson plan available here.

I wrote up the lesson for Learners in their OneNotes, and distributed the task out to them. I mashed up sections of the Ozobot lesson with note taking and reflection questions that linked to the Australian Curriculum.

For the labelled diagram component, students took a photo on Seesaw and then used the ‘Label’ tool to label all of the colour codes that they had used.

I’ve added the student OneNote page here. 

The Seesaw activity that we used for the labelling of their racetracks here.

Ideas for the Younger Years

R/1 Village

In the Early Years, the Digital Technology curriculum focuses on exploring and solving problems.  Learners experimented with using the Ozobots, making predictions and solving simple problems.  This included drawing lines for the Ozobot to follow, and when the Ozobot got confused, they went back and solved this problem, for example, by making the line thicker.  They made predictions based on experiences, such as, “The lights went red when the Ozobot went on the red line.  I think the lights will turn green when it goes on the green line.”

2/3 Village

After the initial exploration stage, learners in the 2/3 Village moved on to experimenting with colour codes.  They explored the best way to draw codes in order for the Ozobot to be able to follow and experimented with executing special moves (moonwalk, zigzag and tornado were favourites!)  Learners then made race tracks incorporating some of the special moves codes.  When codes were unsuccessful, learners developed and shared strategies for improving their track fluency.

Throughout the Villages, it was wonderful to hear the rich discussions around the Ozobots, including how they work, why the Ozobot wasn’t doing what they wanted it to, how to solve problems, negotiate access and work collaboratively.  Ozobots are now definitely on our wish-list for purchases for Digital Technologies at Our Lady of Grace!

I’m honoured

I’m honoured

So, this morning, I woke up to this on my Twitter feed:


To say that I was feeling chuffed was a complete understatement! I clicked onto the link, and was taken here. I scrolled down, and sure enough, there I was!

I have a blurb!

I began writing this blog as a way of reflecting on my own teaching and learning, with the hopes of becoming a better educator.  To learn that I’m helping others too – well, that’s pretty special!  One of the 50 must read blogs in Education for 2018?  Wowsers! Thanks EdTech Magazine for the honour – I’ll do my best to live up to it!

Collaboration is Key

Collaboration is Key

The collaboration space in class OneNote is often under utilised because educators aren’t sure what to do with it, syncing problems when the internet is slow can result in confusion, and students fear their work will be copied. But, when used creatively, the ‘collaboration’ aspect of the Collaboration Space can be a very powerful tool.

Avoid competitive tasks in this space.

I prefer to use the Collaboration Space as a place where learners build resources together that they can all benefit from, where they share their ideas and support each other’s learning. Last year, we worked together and created a series of resources to support and extend each other in creative writing.

In ‘Instead of Said’ students were given five minutes to find as many different ways that they could to make the boring sentence, “The cat sat on the mat,” said Dad more interesting by using words other than ‘said’. They then copied and pasted their ideas into the Collaboration Space. We then had a bank of words to use instead of ‘said’ when including direct speech in narrative writing.

There are so many better words to use rather than, ‘said’!

Learners had so much fun with this activity, and found the said alternative list so useful that I expanded this idea to other aspects of narrative writing.

Emotional Inferencing

We were looking at inference, and ways of suggesting how a character is feeling without actually naming that emotion. So, students selected an emotion each to write about, and we then copied their work into an emotion bank to benefit all students in narrative writing. This was lots of fun, and useful to boot!

You can see down the left all of the different emotions that students selected – such a great resource for writing projects!

I’ve added the ‘Emotion Inferences’ blank page to my shared Bau Teacher Adventures OneNote.  Find the link here, and please feel free to adapt and use!

Spectacular Settings

This year, I’m also going to include a ‘settings selection’ section in the Collaboration Space.  I’m planning on having students gather a variety of pictures of different scenes, seasons etc, and brainstorm some interesting descriptive words to go with them.

Lots of lists

We also use the Collaboration Space as a central location for groups of students (or even the whole Village).  These lists have included;

  • Class brainstorm on what to pack for school camp
  • Sphero project ideas
  • Fitness/ Brain break bank
Ideas for Sphero projects – it was a long list, and there was a great deal of excitement!
This was from before I discovered Forms! Learners initialled their top preferences for lollies for movie night on school camp.

Peer Editing/ Support/ Assessment

Learners complete a rough draft of an essay or project in their personal Notebook section, and then copy and paste the page into the Collaboration Space, where another student provides constructive feedback/ assists with editing/ does a peer assessment.

The original learner then copies the page back into their personal Notebook, and applies any changes/ constructive criticism that they agree with.

Preventing Syncing Errors

Sync errors are the most frustrating aspect of the Collaboration Space, and can turn excitement to dismay in a matter of moments. I have several methods of avoiding this problem, depending on what type of task we are doing.

  • Inserting tables and assigning each student a separate line.
  • Assigning each group of students a separate page within a Section, so all students can easily find each group’s work, but only a few people are contributing to a page at a time.
Students worked on this in groups of 4. Because the table was colour coded, learners were encouraged to talk to each other about which section they were currently added to in order to avoid syncing errors.
  • Learners do the work in their individual Section, and then copy and paste the page to the Collaboration Space, ensuring that they have their original in a safe place.

So, collaborate, don’t compete, and then sit back and listen to your learners’ conversations as they interact, support and encourage each other!

6 Tips for Assessing in OneNote

6 Tips for Assessing in OneNote
  1.   Distribute everything! 

The Distribute and Review functions are easily my favourite Class OneNote tools. With a couple of clicks, I can distribute a page or section out to all of my learners.

Distribution changed my world!

The best part though, is when I want to review or assess their work. I just go into Class  Notebook tools, click on review work and follow the prompts. Then, I have the work of all my students, right there in front of me! This function has dramatically reduced the amount of time that I spend marking.


There are a few tips though;

  • Train your learners to NOT change the title. If they do, OneNote will not recognise that student’s work, and you will have to find it manually. (Not cool people! I remind my learners that they want me in a good mood when I’m assessing, not grouchy because they played with the title.)
  • Distribute EVERYTHING. Even if it is just a title such as “T1 W2 Recount” and a blank page. You never know when you might want to review work.
  • Don’t let learners create their own Sections. Each individual’s section will then be listed, and this is downright irritating when distributing and reviewing work.


  1. Allow alternative assessment methods for learners that need it

When I’m planning assessments, I ask myself what it is that I’m trying to find out. If the answer isn’t about spelling, grammar and punctuation, then I incorporate multimodal assessment features, especially for students with additional needs.

OneNote is great for this, particularly by allowing the insertion of

  • dot points
  • audio responses (read more here).
  • images
  • videos (though sadly, not in Mac at the moment)
  • Youtube will embed directly into OneNote for Mac.

    Audio responses are great for students with dyslexia.
  1. Put questions and answers in tables

This is to make it easy for responses to be clearly written. This makes marking easy, as you don’t have to go searching for student answers amongst the text. More about tables in OneNote can be found in an earlier post here.

No more hunting for answers – I know exactly where to find them!


  1. Keep a copy of the marked rubric in a separate teacher-only location

 Kids will be kids, accidents happen, and I don’t like having to do a job twice. While I mark in the Class OneNote, I also have a second OneNote, containing my assessment data, and I copy and paste the completed rubric with my comments into a page per child.

Two Notebooks open – on the left is my ‘for teacher eyes only’ record, on the right is the Class OneNote.

It takes just a couple of seconds to do, but it provides a back up in case an accident (or “accident”) ever happens. It also means that when I met with parents, I have all the assessment rubrics in the one place.

I used to screenshot the completed rubric and then insert it back in as an image so that students couldn’t change their own grades, but it’s never happened, and I’m diligent about making the copy immediately, so I’ve scrapped the extra work  as being unnecessary.

  1. Include WALT, WILF and rubric in the assessment.

My students learn best when they know what they are learning, why they are learning it, and what I’m looking for when I mark an assessment. With that in mind, I make use of tables and the audio recording tool to enable students to have the best opportunity for success. (read more about differentiation here.)  Whenever I get the chance, I prefer to create the rubric with the learners, so that they understand exactly what they are being assessed on.  This is easy enough to do, and I can distribute the page out to them after we have made the rubric together.

Students refer to these regularly, along with the assessment rubric.
  1. Consider embedding a Form for a self marking component

Marking is one of my least favourite activities as a teacher. When possible, I include a Forms quiz and insert it into OneNote as a part of an overall assessment.  Just create the quiz in Forms, click on’ share’, get the Url and insert into OneNote. OneNote will embed the Form, making it easy for students to find and complete.

An embedded Form is great for a quick assessment.

Finally

What I love the most about assessing in OneNote though is simple logistics. I teach in a Village environment, which this year consists of 67 students, three teachers and three support staff. It simply isn’t possible to carry that many books home. Also, it’s very possible for books to go missing, or for another teacher to need them at the same time. With OneNote, I can assess efficiently, from anywhere.

Skip to toolbar